Thursday, February 28, 2013

Art appreciation - Mary Cassatt - one


 Our Art appreciation group has started up again this year, we have a new member, so 6 boys in total...a happy, lively, lovely bunch!

Before we begun our artist study, we started with a fun project and a bit of a refresher on colour theor
...the boys each created a colour wheel pizza.

Colour wheel Pizza toppings
I gave them each a circle of white card board, they had to divide it into 6 segments - some needed a little help...
They then coloured each segment in the correct colour - first the 3 primary colours - 
red, blue and yellow...
then the secondary colours in between...
 purple, green and orange.
We used oil pastels for this.
Once completed they then had to decorate their pizza with colour coded toppings (pompoms, stickers, foam shapes, foam letters, pipe cleaners, sparkle shapes etc)...lots of fun...

Look at their brightly coloured pizza's...Wonderful!


We then started with our featured artist for this term -  American Impressionist and woman artist...Mary Cassatt.
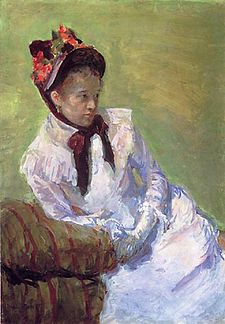
Mary Cassatt-Selfportrait.jpg
self portrait 1878
 We read a brief biography of her and looked at some of her paintings (in books and online).
Lots of talking and sharing happens at this time... 
We also watched a youtube clip.

We learnt that she was passionate about the intimate bond between Mother and child, and was often referred to as 'The artist of mother and children'. 
She worked alot in pastels, a skill taught to her by her good friend Edgar Degas.

For this lesson instead of coping one of her works, I wanted to make the connection with the artist more personal...give the boys some freedom...
So the project for the morning, done with pastels on pastel paper was to create a special memory or time that each of the boys shared with their moms.
Create an artwork of Mother and child...


Each work has a special story to tell...Well done Boys!!

I sent each student home with a project to colour in their own time - The Boating Party

File:Cassatt Mary The Boating Party 1893-94.jpg
The Boating Party 1893 - 1894

Thursday, February 14, 2013

Valentines - day of love...

 We love to bless those around us on days like Valentines day or any other day when we can...
So we decided to make some caped super heros for some special buddies of my knights and his cute sister...
This was lots of fun...
Cut out a cape and a mask from cardboard...we decided to use some googly eyes which we glued on...my knight punched out some hearts to glue onto each cape and then wrote his friends name and "....... you are a super friend".
...a little token of love for the loved ones that surround us...


For Grannies and Grandpas, some home baked biscuits, decorated with pink icing and lovingly decorated with pearly balls...accompanied by a beautiful hand drawn work of art...


From Best Friend and I ...to our precious kiddies...Love bugs (template here)...
a bag filled with worms and chocolate bugs, tied with a ribbon and love note attached...


"If I speak in the tongues of men or of angels, but do not have love, I am only a resounding gong or a clanging cymbal.  If I have the gift of prophecy and can fathom all mysteries and all knowledge, and if I have a faith that can move mountains, but do not have love, I am nothing.  If I give all I possess to the poor and give over my body to hardship that I may boast,but do not have love, I gain nothing"
1 Corinthians 13 verses 1 -3 

Tuesday, February 5, 2013

Raw Fudge

 This was the first raw recipe I tried and we were hooked...it is healthy (amongst other benefits!) and a great treat for the children - who love it...It is rich, so one piece at a time is great...give it a try...I know you will love it!
It comes from this great book - take a look,  and at all the other great things they do...!!


 You will need
1 cup pitted dates
1/2 cup water
1 cup coconut oil
1/2 cup cacao powder
pinch salt
1 tsp vanilla powder

Soak the dates overnight.
Always remember to melt coconut oil first - never use as is in desserts. Place 1 cup coconut oil over a bain-marie (a small glass bowl in a big glass bowl!) and let it melt slowly...do not use boiling water, as you will lose the benefits of raw.
Once it is liquid place in a food processor with all the other ingredients and blend until smooth.
(It will be a  lovely thick chocolately mousse consistency!)
Pour into a shallow fridge dish and refrigerate...
Cut into square's and enjoy

Saturday, February 2, 2013

30% Rye bread

Been wanting to make a rye bread but not found a really nice recipe, 
so I adapted the kita recipe to use with the rye flour...This is a lovely mix, a lovely soft bread...
(I am still working on a larger portion of rye flour bread!)


You will need:
300gr Rye Flour
700gr Stone ground white flour
10g dry yeast
500ml luke warm water
2 eggs
2 Tblsp honey
2 tsp brown sugar
120 gr butter - melted
1 Tblsp salt
seeds for topping  (sesame, poppy, sunflower)
 melted butter and milk wash

Place the rye flour, white flour and salt into a mixing bowl. 
Dissolve the yeast in the warm water, add the 2 tsp of sugar. 
Whisk the eggs with a fork, add the honey, pour into the yeast mixture. 
Melt the butter. 
Pour both the butter and yeast mixture into the flour and mix to form a dough. 
It is quite sticky. Knead for a few minutes - not to long. 
Place the dough back into the bowl, cover with a towel and allow to rise (proving) in a warm spot for 1 hour.
Tip the dough out onto a floured surface and divide into the amount of loaves or rolls you would like to make.Place in greased oven pans.
Brush with a little melted butter mixed with milk onto the breads and 
sprinkle with seeds if using!
Allow to rise for another hour.
Preheat the oven to 180 degrees Celsius and bake the breads for approximately 20 minutes - always keep a check because ovens differ.
This made 2 loaves and 9 rolls as in photo above
Give it a try...

Friday, February 1, 2013

Cheesy Haddock Pie

 Been feeling like haddock pie again... So decided to try something different...I made 2 pies, one I put the puff pastry underneath and one on top...just for fun... 
very delicious and got thumbs up from all family members. 
The filling has a very light 'n fluffy taste and feel due to the beaten egg whites...
give it a try!


You will need:
approx 400g smoked haddock (skinless, deboned and smoked!)
 spring onions (i used a whole packet bought from Woolworth's - salad onions!)
8 potatoes - peeled and cubed
900ml milk
200 ml milk
4 eggs
4 Tblsp mazina (cornflour)
 couple of squeezes of lemon
approx 140gr of cheddar cheese (more if you like a really cheesy taste!)
pinch seasoning
salt n pepper
roll puff pastry - ready made ;-)

pastry underneath
  Chop the onions and put into a large pot with a drizzle of olive oil, and simmer...
while peeling potatoes...cube the potatoes into small bite size pieces and add to the pot, 
saute with the onions. 
Add the haddock and 900ml of milk, some salt and pepper to taste and a pinch of seasoning,
I always use this stock powder for seasoning. 
Let this simmer away for a while, until potatoes are cooked - keep an eye on this, you don't want the potatoes to be mash!! 
Separate the eggs, add the 200ml of milk and 4 Tablespoons of mazina (cornflour) 
to the egg yolks and beat well. 
Beat the egg whites till stiff. 
Grate the cheese.
Add a few spoons of the warm milk from the pot to the egg yolk mixture, then add to the pot...
stir and it will become thick and creamy, add the lemon juice and cheese - check if it needs a little more salt and pepper. 
Take off the stove and fold in the egg whites. 
Spoon the mixture into a pie dish that has been lined with ready made puff pastry...or spoon into an oven dish and then cover with ready made puff pastry (give the pastry an egg wash with some egg that had been beaten and a pastry brush!)...
either way this is delicious...
Bake in over at 180 degrees Celsius until tops are browned...

pastry on top with egg wash
 Serve with a blanched mixture of fresh veggies...


(I initially thought, this is a pretty expensive pie, due to all the ingredients and milk but as you can see it made 2 big pies, so 2 dinners for our family, plus left over for my rocks lunch!!)

 Enjoy!!

Homemade Ink

I saw this awhile ago on Pinterest, and stored in it the back of my mind...
forgot to pin it (!!)...
Anyway it is a great way to make a lovely ink for art works...
instead of just throwing the old khokis away...
Every few months we go through all the khokis and test them...
its not fun creating with half dry khokis...


We grouped the colours together and then tied an elastic band around them, put them in a clean glass jar with some water...
leave over night or longer...
The colours do intensify the longer they are in the water...
we did red and green first...you can see in the photo above ;-)


Yesterday my knight created a batik, using a candle and these inks...we are learning about crafts around the world...and yes...those are swords!! 
Mom added the soft touches of a flower and heart!
..a quick fun craft...

Still need to come up with an idea of what to do with all the khokis lids....
ooooh love I colour...
Any ideas?...